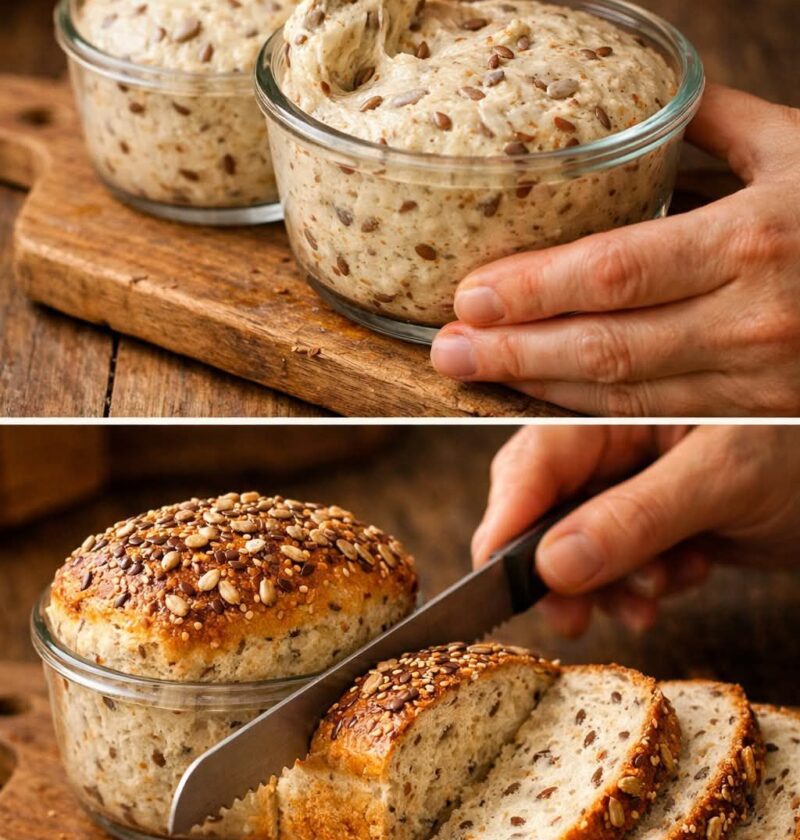
The Magic of Making Fresh Bread in a Jar
Making bread in a jar is a truly wonderful and unique way to bake that many people are just starting to discover. This recipe is all about taking the simple and classic process of baking bread and putting it into a small and convenient glass container that makes the whole experience much more manageable for everyone. Instead of dealing with giant loaves that might go stale before you can finish them you are creating perfectly sized portions that stay fresh for a very long time. The process involves mixing a simple dough and letting it rise and bake directly inside a wide mouth glass jar which creates a beautiful and rustic look. It is a fantastic method for beginners who might feel scared of traditional bread making because the jar acts as a guide for the shape and size of your loaf. You do not need any special baking pans or expensive equipment to get started with this project today. It is all about using what you have in your pantry to create something warm and filling and delicious for your family and friends to enjoy together at the table.
People absolutely love this recipe because it is incredibly practical and saves a lot of time and effort in the long run. There is something very satisfying about seeing a tiny loaf of bread perfectly formed inside a clear glass jar with a golden brown crust on top. It makes for a wonderful gift because you can put a lid on the jar and tie a ribbon around it to give to a neighbor or a coworker for a special occasion. Because the bread is sealed inside the glass it often stays much softer and moister than a standard loaf that is exposed to the air on a cooling rack. Many people enjoy the portion control that comes with this method since you can bake exactly what you need without any waste at all. It is also a very fun activity to do with children because they love watching the dough grow bigger and bigger through the glass as it sits in a warm spot. The cleanup is very easy as well since the jar serves as both the baking dish and the storage container for the finished product.
You should consider making this bread in a jar when you want to fill your home with the cozy and comforting smell of a professional bakery without the heavy work. It is the perfect recipe to try on a rainy Sunday afternoon when you want to slow down and enjoy a simple task that results in a tasty reward. Many people choose to bake this when they are feeling a bit stressed because the act of kneading dough is very relaxing and therapeutic for the mind and soul. From a taste perspective this bread is superior to anything you can buy at a local grocery store because it contains no preservatives or artificial ingredients. If you are focused on fitness or healthy eating you can control exactly what goes into your dough such as using whole wheat flour or adding seeds for extra protein. It is also a great solution for people who live alone or in small apartments where storage space is limited and a full size bread pan is too bulky. Making this bread is a way to celebrate the simple joys of life and to treat yourself to a warm and buttery slice of heaven whenever you feel like it.
This recipe is special because it connects us to a long history of home baking while adding a modern and clever twist that fits into our busy lives. You do not have to be an expert to get a perfect result every single time you put a jar into the oven. The glass provides an even heat distribution which helps the crust become crunchy while keeping the inside light and airy and soft. It is an empowering feeling to know that you can create your own food from scratch using just a few basic staples like flour and water and yeast. As you become more comfortable with the process you can start to experiment with different flavors and textures to make the recipe your own. Whether you are eating it warm with a spread of jam or using it to make a small sandwich for lunch this bread will always hit the spot. It is a recipe built on love and simplicity and the idea that good food should be accessible to everyone regardless of their cooking skills. Once you try baking in a jar you might never want to go back to the traditional way of making bread ever again.
Ingredients You Will Need
To make four small jars of fresh bread you will need to gather these simple ingredients from your kitchen. Please ensure your yeast is fresh so the bread rises correctly.
-
500 grams of all purpose white flour
-
325 milliliters of warm water
-
7 grams of active dry yeast
-
10 grams of granulated white sugar
-
8 grams of fine sea salt
-
30 milliliters of olive oil
-
15 grams of butter for greasing the jars
-
1 large egg for the optional egg wash on top
Step by Step Method
-
Start by selecting four wide mouth glass jars that are safe for oven use and wash them very well with hot soapy water and dry them completely.
-
In a large mixing bowl combine the warm water and the sugar and the active dry yeast and stir them gently until the yeast is dissolved.
-
Let the yeast mixture sit for about ten minutes until it becomes very foamy and bubbly which tells you that the yeast is alive and ready to work.
-
Add the olive oil and the sea salt to the bowl and then slowly begin to stir in the flour one cup at a time using a sturdy spoon.
-
Once a shaggy dough starts to form turn it out onto a clean and floured surface and begin to knead it with your hands for about eight minutes.
-
Continue kneading until the dough feels very smooth and elastic and it does not stick to your fingers or the table anymore.
-
Place the dough in a lightly oiled bowl and cover it with a warm damp cloth then let it rise in a quiet spot for one hour or until it doubles in size.
-
While the dough is rising take your butter and rub it all over the inside of your glass jars making sure to cover every spot so the bread does not stick.
-
After the dough has risen gently press the air out of it and divide it into four equal pieces that look like small smooth balls.
-
Drop one dough ball into each prepared jar and cover them again to let them rise for another thirty minutes until they reach about halfway up the jar.
-
Preheat your oven to 190 degrees Celsius while the jars are sitting for their second rise.
-
If you want a shiny crust you can whisk an egg and brush a tiny bit over the top of each dough ball right before baking.
-
Place the jars carefully on a baking sheet and slide them into the center of the oven for about twenty five to thirty minutes.
-
Watch for the tops to turn a beautiful golden brown color and you can test for doneness by tapping the top to hear a hollow sound.
-
Remove the jars from the oven using thick oven mitts and let them cool for at least ten minutes before you try to remove the bread or eat it.
Why This Recipe Is Special
This bread in a jar recipe is special because it combines the nostalgia of home cooking with a very smart and modern presentation. The health benefits are significant because you are avoiding the high fructose corn syrup and the conditioners that are found in most commercial breads. You are getting a clean product that is easy for your body to digest and full of the natural energy that comes from high quality grains. The taste is truly unmatched because the glass jar traps the steam during the first part of the baking process which acts like a professional steam oven. This results in a crumb that is incredibly soft and a crust that has a wonderful snap to it. It is also a very sustainable way to bake because you are reusing glass jars rather than buying plastic wrapped loaves from the store. This recipe allows you to be the master of your own kitchen and provides a sense of pride that only comes from creating something beautiful and nourishing with your own two hands.
Extra Tips for Better Taste
To take your bread to the next level you can try adding a teaspoon of dried rosemary or thyme to the dough for a savory herb flavor. If you love cheese you can fold in a small handful of shredded cheddar or parmesan right before you put the dough into the jars. For those who have a sweet tooth adding a few raisins and a sprinkle of cinnamon can turn this into a lovely breakfast treat. Always make sure the water you use for the yeast is warm but not hot because water that is too hot will kill the yeast and your bread will not rise. You can also sprinkle some coarse sea salt or sesame seeds on top of the egg wash for extra texture and a professional look. If you want a softer crust you can rub a little bit of butter on the top of the bread as soon as it comes out of the oven while it is still steaming hot. Storing the jars in a cool and dark place will help the bread stay fresh for several days if you manage not to eat it all immediately.
Final Thoughts
Baking bread in a jar is a delightful journey that brings a lot of joy to the kitchen and a lot of flavor to the dinner table. It is a simple habit that can change how you think about food and help you appreciate the basic ingredients that keep us healthy and happy. Whether you are making this for yourself or sharing it with someone you love the experience of breaking fresh bread is always a special moment. I hope this recipe becomes a regular part of your life and that you enjoy every warm and delicious bite that comes out of your oven.
Nutrition Details
Disclaimer
Please be aware that every kitchen environment is different and your baking results might vary based on your local altitude or the humidity in your home. This recipe involves working with a hot oven and glass jars so please use caution to avoid burns or breaking the glass. The nutritional information provided is an estimate based on standard ingredients and your specific totals may change depending on the brands you choose to use. If you have any specific dietary restrictions or allergies please consult with a professional health expert before trying new recipes. Always ensure your jars are rated for high heat before placing them in a hot oven to ensure safety during the baking process.