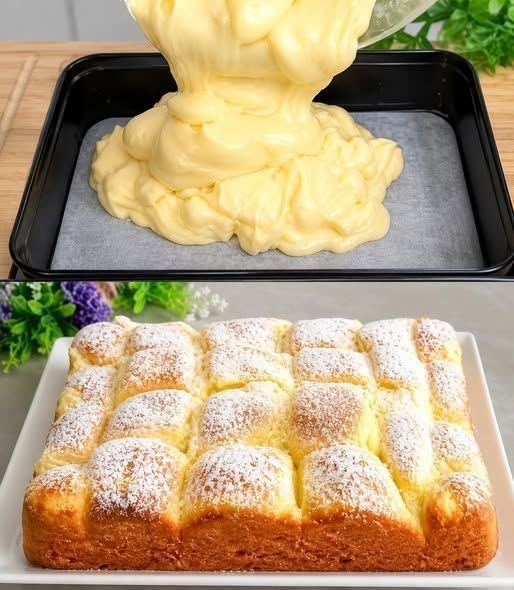
Fluffy Vanilla Butter Buns Recipe (Soft, Light, and Bakery-Style)
There’s nothing quite like the aroma of freshly baked vanilla butter buns filling your kitchen. These soft, fluffy buns are lightly sweetened, enriched with butter, and infused with the comforting flavor of vanilla. They are perfect for breakfast, afternoon tea, dessert, or even as a delicious snack. Their golden crust, pillowy interior, and rich buttery taste make them a favorite among both children and adults.
Whether you’re an experienced baker or trying homemade bread for the first time, this recipe is easy to follow and produces consistently soft and fluffy buns. The secret lies in proper kneading, allowing enough rising time, and using quality ingredients.
Why You’ll Love These Fluffy Vanilla Butter Buns
These vanilla butter buns are:
- Soft and incredibly fluffy
- Rich with buttery flavor
- Lightly sweet with a pleasant vanilla aroma
- Perfect for breakfast or dessert
- Great for freezing and reheating
- Easy enough for beginners
Unlike store-bought buns, homemade vanilla butter buns contain fresh ingredients without unnecessary preservatives, giving them a superior taste and texture.
Ingredients
For the Dough
- 4 cups (500g) all-purpose flour
- 2¼ teaspoons (7g) instant yeast
- ¼ cup (50g) granulated sugar
- 1 teaspoon salt
- 1 cup (240ml) warm milk
- 1 large egg
- ¼ cup (60g) unsalted butter, softened
- 2 teaspoons vanilla extract
For the Egg Wash
- 1 egg
- 1 tablespoon milk
Optional Butter Glaze
- 2 tablespoons melted butter
- 1 teaspoon vanilla extract
- 1 tablespoon powdered sugar (optional)
Kitchen Equipment Needed
- Large mixing bowl
- Measuring cups and spoons
- Stand mixer (optional)
- Baking tray
- Pastry brush
- Plastic wrap or kitchen towel
- Cooling rack
Step 1: Activate the Yeast
If you’re using active dry yeast instead of instant yeast, combine the warm milk with one tablespoon of sugar and sprinkle the yeast over the top.
Allow it to sit for about 5–10 minutes until the mixture becomes frothy.
If using instant yeast, you can mix it directly with the flour without activating it first.
Step 2: Mix the Dough
In a large bowl combine:
- Flour
- Sugar
- Salt
- Instant yeast
Mix the dry ingredients together.
Add:
- Warm milk
- Egg
- Vanilla extract
Mix until a rough dough begins to form.
Now add the softened butter.
Continue mixing until all ingredients are incorporated.
Step 3: Knead the Dough
Transfer the dough onto a lightly floured surface.
Knead for approximately 10–12 minutes.
The dough should become:
- Smooth
- Elastic
- Slightly tacky but not sticky
If using a stand mixer, knead using the dough hook for about 8 minutes.
Proper kneading develops gluten, which creates the soft and fluffy texture.
Step 4: First Rise
Place the dough into a lightly greased bowl.
Cover with plastic wrap or a clean towel.
Allow it to rise in a warm place for approximately 1 to 1½ hours.
The dough should double in size.
Do not rush this step, as proper fermentation develops flavor and texture.
Step 5: Shape the Buns
Punch down the risen dough to release excess air.
Transfer it onto a clean work surface.
Divide into 12 equal portions.
Roll each portion into a smooth ball.
Arrange them on a greased or parchment-lined baking tray, leaving a little space between each bun.
Step 6: Second Rise
Cover the buns loosely.
Allow them to rise again for 30–45 minutes.
During this second rise, the buns become even lighter and puffier.
Meanwhile, preheat your oven to 350°F (175°C).
Step 7: Apply Egg Wash
Beat together:
- One egg
- One tablespoon milk
Brush the tops of each bun gently.
This creates the beautiful shiny golden finish after baking.
Step 8: Bake
Bake for approximately 18–22 minutes.
The buns should be:
- Golden brown
- Lightly crisp on top
- Soft underneath
Avoid overbaking, as this can dry them out.
Step 9: Butter Glaze
Immediately after removing the buns from the oven, brush them generously with melted butter mixed with vanilla extract.
This adds:
- Rich buttery flavor
- Soft glossy finish
- Extra moisture
Allow the buns to cool for about 10 minutes before serving.
Serving Suggestions
These fluffy vanilla butter buns are delicious served:
- Warm with butter
- With strawberry jam
- Honey
- Chocolate spread
- Cream cheese
- Fresh fruit
- Peanut butter
- Lemon curd
They also pair beautifully with:
- Coffee
- Tea
- Hot chocolate
- Warm milk
Tips for Perfect Fluffy Buns
Use Warm Milk
The milk should feel warm but not hot.
A temperature around 100–110°F (38–43°C) is ideal.
Hot milk can kill the yeast.
Measure Flour Correctly
Too much flour creates dense buns.
Spoon the flour into the measuring cup and level it off rather than scooping directly.
Knead Thoroughly
Proper kneading builds gluten, which creates soft bread with excellent structure.
Don’t Skip the Second Rise
The second rise helps create a lighter crumb and improves the final texture.
Brush with Butter
Fresh butter brushed on immediately after baking keeps the crust soft.
Recipe Variations
Cinnamon Vanilla Buns
Add:
- 2 teaspoons cinnamon
- ¼ cup brown sugar
Roll the dough into a log before slicing.
Chocolate Chip Vanilla Buns
Fold in:
- ¾ cup mini chocolate chips
Perfect for children and dessert lovers.
Coconut Vanilla Buns
Mix into the dough:
- ½ cup shredded coconut
Sprinkle extra coconut on top before baking.
Raisin Vanilla Buns
Add:
- ¾ cup raisins
Soak the raisins first for extra softness.
Lemon Vanilla Buns
Add:
- 1 tablespoon lemon zest
The citrus flavor complements the vanilla beautifully.
Storage Instructions
Store cooled buns in an airtight container.
They remain soft for:
- 2–3 days at room temperature
- Up to 1 week in the refrigerator
Warm briefly before serving.
Freezing Instructions
These buns freeze extremely well.
After cooling completely:
- Wrap individually in plastic wrap.
- Place in a freezer-safe bag.
- Freeze for up to 3 months.
To serve, thaw at room temperature and warm in the oven or microwave.
Common Mistakes to Avoid
Adding Too Much Flour
Extra flour makes heavy buns.
The dough should remain slightly soft.
Using Cold Ingredients
Room-temperature ingredients help the dough rise evenly.
Under-Kneading
Insufficient kneading produces dense bread.
Overproofing
Letting the dough rise too long may cause the buns to collapse during baking.
Overbaking
Bake only until lightly golden for maximum softness.
Nutritional Information (Approximate Per Bun)
- Calories: 220
- Protein: 6g
- Carbohydrates: 33g
- Fat: 7g
- Saturated Fat: 4g
- Sugar: 6g
- Fiber: 1g
- Sodium: 180mg
Values may vary depending on ingredient brands and portion sizes.
Frequently Asked Questions
Can I use bread flour?
Yes. Bread flour produces slightly chewier buns with excellent structure while still remaining soft.
Can I make the dough ahead of time?
Absolutely. After the first rise, refrigerate the dough overnight. Allow it to come to room temperature before shaping and completing the second rise.
Can I use salted butter?
Yes, but reduce the added salt in the recipe to avoid an overly salty flavor.
Why didn’t my buns rise?
Common reasons include expired yeast, milk that was too hot, or proofing the dough in a cold environment.
Can I make these buns dairy-free?
Yes. Substitute the milk with a plant-based alternative such as oat, soy, or almond milk, and replace the butter with a dairy-free baking butter.
Final Thoughts
Fluffy vanilla butter buns are a timeless homemade treat that combines simple pantry ingredients with classic baking techniques to create irresistibly soft, fragrant, and delicious bread. Their tender crumb, rich buttery flavor, and delicate hint of vanilla make them suitable for breakfast, tea time, celebrations, or a comforting everyday snack. With proper kneading, patient proofing, and careful baking, you can achieve bakery-quality results right in your own kitchen. Once you’ve mastered this recipe, you can easily customize it with chocolate chips, cinnamon, coconut, dried fruit, or citrus zest to create new variations for every occasion. Fresh from the oven and brushed with melted butter, these buns are sure to become a favorite recipe you’ll return to again and again.